Toolbox: Build
The Build group of the route builder: Add Point, Explore, Add POI, Locate Me, the four routing modes, zoom-dependent snapping, orange off-road anchors, and what you see as you build.
Last checked against the live app on 3 September 2026.
The route builder is the Plan tab, a full screen map with the Toolbox down the left side, so the tools stay beside your route rather than on top of it.
- Click the map to place a point.
- Click again to place the next point.
- INVIA draws the line between the two points.
INVIA routes on the road where there is a road, and draws a straight line where there is not, so the same two clicks build a highway route or a cross-country one.
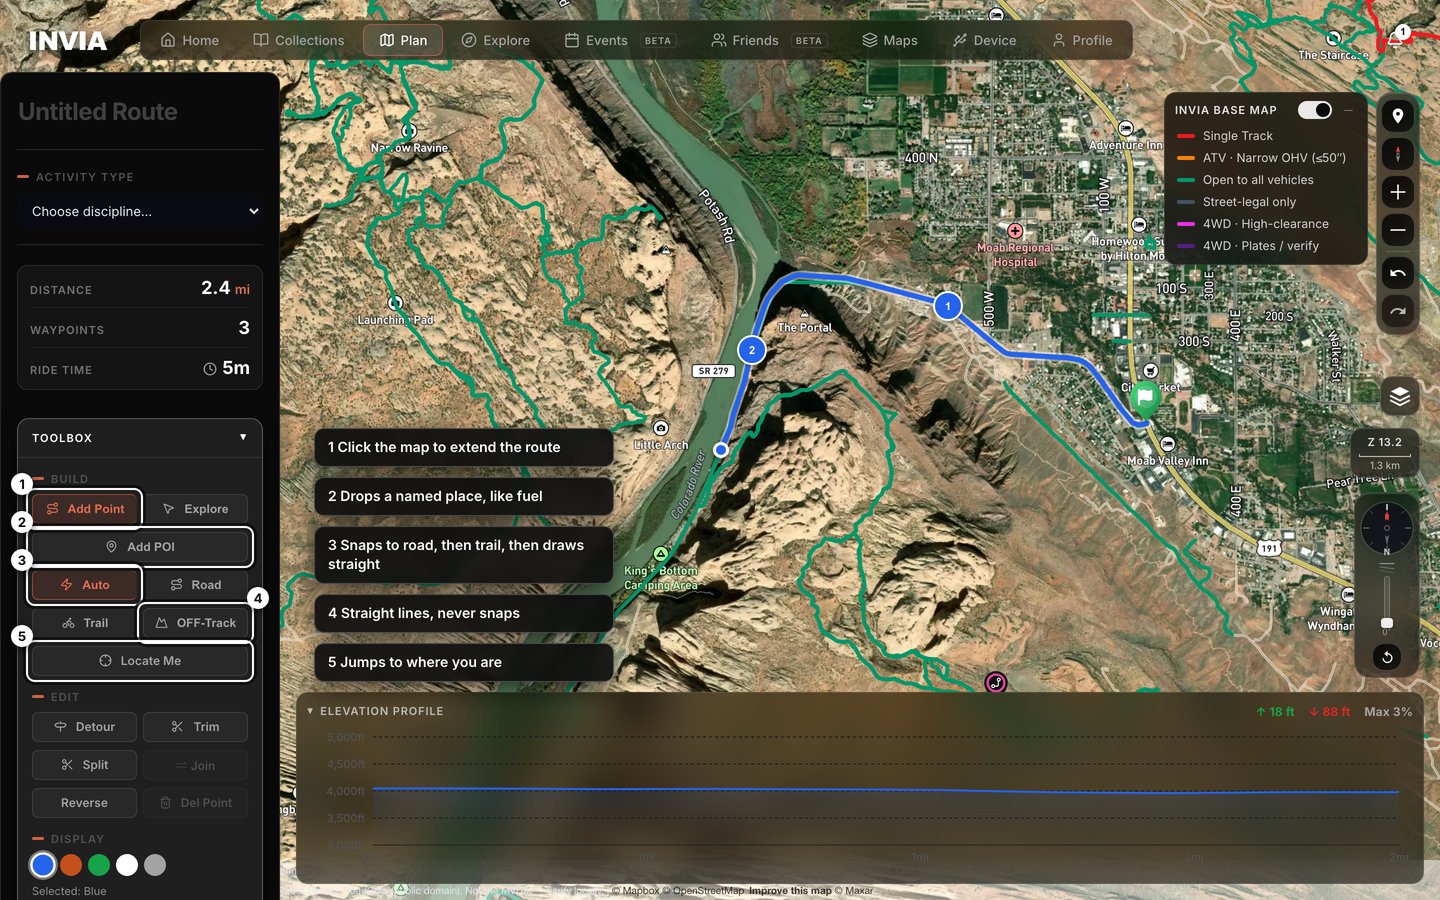
- Click the map to extend the route
- Drops a named place, like fuel
- Snaps to road, then trail, then draws straight
- Straight lines, never snaps
- Jumps to where you are
The route in the picture is three clicks on Kane Creek Boulevard. The line bends with the road because each click landed on the road, which is what Auto does whenever a road is there to snap to.
Build#
Add Point#
Click the map to add a route point, and INVIA connects it to what you have by road. A new point always goes on the end of the route, so this is the tool for carrying a route onward rather than for changing its middle.
To add a named stop in the middle of the route, use Add POI.
Explore#
Click a road or a pin to read its number, class, season and agency, so you can find out what a track is before you commit a route to it.
- Nothing is added to your route.
- The route line stays exactly as it was.
- Press Esc to leave Explore.
Add POI#
Click the map to drop a named point of interest. The popup offers Fuel Stop, Camp, Vista, Hazard, Food, Service, or a Custom Name, and you then type a name and notes so the stop still means something to you weeks later.
Off route (marker only, don't reroute to it) is checked by default, because most points of interest are things you want marked on the map rather than places you want the route bent towards.
| Checkbox | What lands on the map |
|---|---|
| Checked, the default | A pin beside the route. The route line does not change. |
| Unchecked | A stop inserted into the nearest segment. The route runs through the point. |
Locate Me#
Flies the map to your GPS position. If the route is empty, the route starts at that position, so you can begin a route from where you are standing instead of hunting for that spot on the map.
The four routing modes#
One mode is active at a time, and the mode decides how INVIA joins your next two clicks.
| Mode | What it does |
|---|---|
| Auto (default) | Snaps to roads where they exist, straight-lines where they do not. Tries the road network first, then the trail network, and only then draws a straight line marked off-road. |
| Road | Every segment on the road network, nothing else. |
| Trail | Routes on trails and tracks. If trail routing is unavailable INVIA falls back to a road route and says so. |
| OFF-Track | Straight lines only, never snapping to a road, so the line goes exactly where you click. |
Switching modes changes only the next segments you draw, so you can change your mind partway along a route. Everything already on the map stays exactly where it is. To move a section you have already drawn, use Detour.
When trail routing is unavailable#
INVIA tells you it fell back to a road route, and it draws the line rather than leaving a gap in it.
- The segment is drawn. It follows roads instead of trails.
- The whole line is redrawn on roads, from your first point to your last, because a stretch that cannot be routed on trails takes the rest of the line with it.
- Trail stays selected. Nothing switches the mode off, so the button keeps its highlight and your next click is still a trail click.
- The stretch that failed is remembered for one minute, which means a click during that minute lands you back on the road route.
- After that minute INVIA tries trails again, and a stretch between two new points is always tried on trails first.
- Nothing is required of you. The route is complete and you can keep building.
- To draw that segment off the road network instead, switch to OFF-Track and place the points again.
Zoom sets the snap tolerance#
How far INVIA reaches for a road or a trail is set by your zoom, so a click at street level has to sit much nearer a road than it does zoomed out.
| Zoom | How far INVIA reaches |
|---|---|
| Zoom 17.5 and closer | About 10 meters |
| Zoom 16.5 up to 17.5 | About 20 meters |
| Zoom 14 up to 16.5 | About 30 meters |
| Zoom 13 | About 40 meters |
| Zoom 12 | About 80 meters |
| Zoom 10 and further out | About 300 meters |
Below zoom 14 the reach keeps widening as you pull back until it meets the 300 meter limit at about zoom 10, and it stays at 300 meters however far out you go.
The same click can snap to a road at one zoom and be declared off-road at another. Zoom in when you want the point on one particular road, because at street level only a road within about 10 meters is close enough to catch it.
Off-road segments and orange anchors#
Two things happen when neither the road network nor the trail network has anything near your click. The segment is drawn straight, and the point becomes an orange anchor, which is a point that is not on a road with a straight line drawn exactly through it.
Orange anchors are the one part of the line you can drag, and dragging one redraws its two straight segments at once so the line follows the anchor as you move it.
Once a segment is off-road the next clicks keep drawing straight, and the off-road chain ends when a click lands within about 10 meters of a road. Road routing resumes from there.
Anchors fade out as you zoom out, and below zoom 11 the anchor markers are not drawn, so a long off-road route stays readable when you pull back.
- The anchors are still on the route. Only the markers are hidden.
- The route line, its distance and its shape do not change.
- Zoom back in to zoom 11 or closer to see the anchors and drag them again.
Routing Options#
Three options shape the road route INVIA picks for you, and they are available in Road mode.
- Avoid Highways
- Avoid Tolls
- Avoid Unpaved
Changing one re-routes the whole route straight away, so your route points stay where you placed them and only the line between them is redrawn.
The three options are disabled in Auto mode and in Trail mode, which means you cannot change a tick while either of those is selected. OFF-Track mode leaves the boxes editable, and a straight line ignores all three because it never touches a road.
- You cannot press them in those two modes.
- Your route is unchanged, and every other Build tool still works.
- Switch to Road mode to change a tick.
Auto mode goes on applying all three every time it routes a stretch on roads, because Auto looks for a road first and keeps to the road network wherever there is one. The boxes are dimmed in Auto and in Trail because they cannot be edited there, not because the road network goes unused.
A tick survives a change of mode, because switching mode changes the mode and nothing else, so an option set in Road mode is still set when you come back.
What you see as you build#
The figures beside the map fill in as you click, so you can judge the ride before you commit to saving it.
- Distance.
- Waypoints. This is a count of route points. Unnamed route points are counted too.
- Ride time. This is estimated from the distance and your Activity Type.
- A fuel stop reminder, once the route grows past a typical range for your discipline. Dismiss it. The route does not change.
- The Elevation Profile panel. It shows total climb, total descent and maximum grade, with your named waypoints plotted on the profile. Hover the chart to read distance, elevation and grade at any point.
- Mile markers along the line.
- A draggable green pin at the start.
- A blue dot at the finish.
Each Activity Type has its own average speed, which is why the ride time moves when you switch between Adventure, Dual Sport, Enduro, Road, ATV, SXS, or 4x4.
The Elevation Profile is built two ways. In Trail mode the heights arrive with the trail data, so the profile draws at once. In the other three modes INVIA reads the terrain at points about a quarter mile apart, so the profile is a close reading of the ground rather than an exact one. On a route past about 50 miles those points are spaced further apart, so that no route uses more than 200 readings. The terrain heights themselves are recorded about every 5 meters on the ground, which is why a sharp pass still shows on the profile.
Search, colors and overlays#
Search address or place flies the map to a location and adds it as a named route waypoint, so a town or a trailhead becomes part of the route.
Display sets the route color. Display also turns on heat maps, which show you where the riding is concentrated before you decide where to draw.
| Heat map | What it overlays |
|---|---|
| Global | Everyone's public routes and rides. |
| Mine | Your own routes and rides. Pro accounts only. |
The Mine row is never hidden, because INVIA draws the button in place so you can see the layer is there. When Pro enforcement is on and your account does not have the feature, the button carries a small lock. Pressing it does not turn the red layer on, and the message reads Your personal heatmap is a Pro feature. beside a See Pro plans button that opens the plan picker.
- Your routes and rides are all still saved and still on the map.
- Global sits beside Mine, it is free, and it works on every account.
Overlay drops any saved route, ride, collection or imported GPX under your route as a reference layer, so you can trace a line you already have without leaving the builder.
Map controls#
The right-hand column holds these controls, which keeps the map's own tools clear of the Toolbox.
- Go to my location.
- Reset north.
- Zoom.
- Undo (Ctrl+Z) and Redo (Ctrl+Y).
- The basemap picker.
- 3D.
- Labels.
- The layer control.
- The INVIA Base Map legend.