Send a route to your Garmin
Send a route, ride or collection to a connected Garmin: from the builder, a library item or the Device page; the Send to device dialog, arrows, nearby waypoints, and what lands on the unit.
Last checked against the live app on 3 September 2026.
Connect the Garmin on the Device page, then send. INVIA writes the file to the Garmin from the browser tab, so you do not need Garmin Express or BaseCamp. It also picks the right folder for your model, which means you never have to find that folder yourself. INVIA sends to Garmins that appear as a USB drive, and to Garmins that never appear as a drive, because it also transfers over MTP. No other web application outside Garmin sends files to a Garmin over MTP from a browser tab, which is why the transfer happens in the page instead of in a desktop program. Connecting.
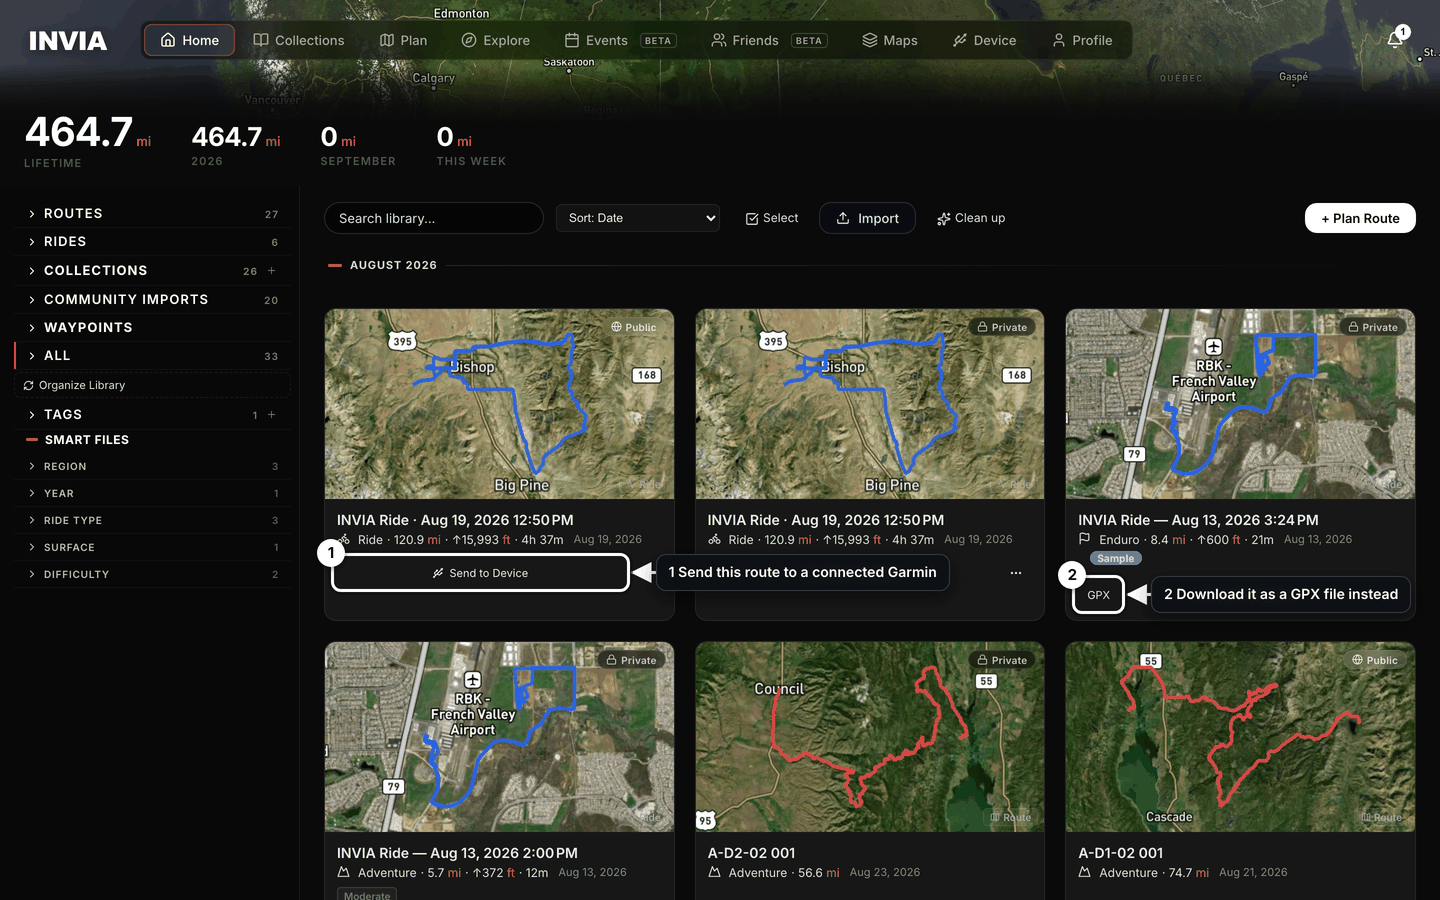
- Send this route to a connected Garmin
- Download it as a GPX file instead
Send a route#
A send can start from four places, so you can reach the Garmin from wherever you already are.
| Where you are | What you press |
|---|---|
| The route builder, with the route built and named | Send to Garmin |
| A saved route or ride, on its library card or its item page | Send to Device |
| The Device page, for a saved route, ride or whole collection | From INVIA |
| The Device page, for a GPX file on your computer | From computer |
From INVIA draws the route on the device map before it sends, so you see the line you are about to transfer.
- Connect. Open the Device tab and plug in the Garmin, then connect it with File transfer (MTP) or USB drive. The status card shows the device name, which is how you know INVIA has the Garmin.
- Start the send. Press the action from the table above.
- Answer the nearby prompt. INVIA asks about saved waypoints within 750 meters of the route that are not already on it, so the places you marked near the line can go over with it. The prompt reads N saved waypoints near this route. Include them with this route on the device? Press Skip or Include N. INVIA makes the offer for a saved route only, never for a recorded ride, so sending a ride goes straight to the SEND TO DEVICE dialog in step 4.
- Press Skip. The route is sent without those waypoints. They stay in your INVIA library, so you can send them another time.
- Press Include N. The route and those waypoints go to the Garmin together.
- Set the options. The SEND TO DEVICE dialog carries three settings, and each one changes what you get on the Garmin.
- Name. The name the file carries on the Garmin, 44 characters at most.
- Storage. Internal or SD Card. The storage list appears only when the Garmin has more than one place for the file, so a Garmin with one place shows no choice.
- Directional arrows. Off, Forward or Reverse.
- Press Send. A progress bar fills and the dialog reads SENT. The file appears under On Device straight away, because that list shows what INVIA just sent rather than what it has read back. To read the tracks off the Garmin instead, press ↺ Refresh.
Directional arrows#
Arrows are small chevrons drawn into the track line itself, so the direction of travel is part of the line the Garmin draws. Complex junctions read correctly on the device screen, and the direction around a loop is never in doubt.
Arrows and saved places travel together without conflict, because the chevrons are drawn into the track line while every saved place arrives as its own point on the Garmin. Setting Directional arrows to Forward or Reverse skips the offer of nearby saved waypoints, which is a choice INVIA makes for that send rather than a limit on what the Garmin can hold. That changes step 3.
- You do not see the nearby-waypoints prompt.
- Nearby saved waypoints are not added to that send, because INVIA never asks about them.
- The route's own named waypoints still travel with the route, so the places you marked while building it arrive as usual, arrows or not.
- To include the nearby saved waypoints, set Directional arrows to Off and send again.
What lands on the Garmin#
- The route as a track, which means the Garmin draws your exact line instead of re-routing it on its own map.
- Named waypoints as saved places, never as a route of via-points, so no stray gray line connects them.
- Route color. A Garmin draws routes in its own set of colors, so INVIA matches your color by hue to the nearest color the Garmin carries. Verified on the Montana 700-series.
A whole collection goes as two files, so both the lines and the places arrive: one multi-track GPX carries the geometry, and one saved-places file carries every pin.
- A pin that appears in more than one member is sent once, rather than once for every member that holds it.
- Member filenames are made unique, so no member file replaces another.
From computer#
Loading a GPX file from your computer draws it on the device map first, so you can see what is in the file before any of it reaches the Garmin. INVIA asks Import X to device?.
Some navigation apps embed a geocoded cue point at every street address along the way, so INVIA removes those cue points before it sends. They do not become pins or stops on the Garmin, which leaves the device's saved places as the ones you chose. Your real waypoints are kept and sent, and what goes across is a clean regenerated file. A multi-track file goes as one track file plus a separate Waypoints saved-places file.
The toast names what arrived, so you know whether anything needs sending again.
| Toast | What arrived on the Garmin |
|---|---|
| Sent "{name}" to your device | The track and the waypoints. |
| Sent "{name}", but its waypoints didn't transfer | The track is on the Garmin. The waypoints file is not. Send the file again. |
INVIA then offers to save the file to your INVIA library as well, so a file you loaded from the computer does not have to be found on the computer again.
Pressed Send before connecting?#
INVIA queues the send rather than dropping it, so pressing the action early costs you nothing. The route is not sent yet, and it is still in your INVIA library.
Two things tell you the send is waiting:
- A toast that reads Queued, connect your Garmin to send "{name}".
- The Device page, showing {name} queued, connect your Garmin to send it and a Send now button.
Finish the send:
- Connect the Garmin as usual.
- Answer Send "{name}" now? when it appears. One click finishes the send.
What you need#
- Chrome or Edge. Sending to a Garmin over USB works only in those two browsers, so use one of them for the send. Everything else on INVIA works in any browser.
- On Windows, INVIA Bridge. It is a free one-time install, and you need it whether the Garmin connects by file transfer or as a drive.
- On a Mac, nothing extra for either connection, so plug in and send.
On a Zumo XT2, Zumo XT3 or a Tread, use a memory card#
Fit a memory card in a Zumo XT2, Zumo XT3 or Tread before you send. Those three models do not keep a sent track as a file. A card fitted before the send keeps the route file on the Garmin after it starts up.
With no memory card fitted, INVIA writes the route file to internal storage. The Zumo XT2, Zumo XT3 or Tread then imports the track into its own database on the next boot and deletes the route file it read.
What you see afterwards on a Zumo XT2, Zumo XT3 or Tread with no card fitted:
- The route still works on the Garmin. You can ride it.
- The route file is no longer in the On Device list in INVIA.
- You can no longer copy that route back off the Garmin.
With a memory card fitted, the route file survives the boot and the track still imports, which is why INVIA can still see everything you have sent.
INVIA picks the destination for your exact model, so all you do is check the storage list in the SEND TO DEVICE dialog and choose SD Card. Where a Garmin keeps your tracks, folder by folder.
Limits#
Free accounts have a device-send allowance, so the send itself is metered while the rest of the Garmin connection is not. When the allowance is used up:
- The message reads Device send limit reached.
- The route is not sent. It stays in your INVIA library.
- A Pro account has no device-send limit.
- Connecting, browsing the Garmin and importing from it are never limited, on any account, which means you can still read what is already on the device.
No computer at all#
You can still get a route onto the Garmin from your phone, because the Garmin Tread app and the Garmin Explore app both accept a GPX file.
- Export the route from INVIA as a standard GPX file.
- Open the Garmin Tread app or the Garmin Explore app on your phone.
- Give the file to that app. Both apps accept GPX and push it to the Garmin.