The item page
The full view of a route or ride, top to bottom: header row, name and color, badges, stats, community panel, your rating, waypoints, tags, collections, the action row, and the map.
Last checked against the live app on 3 September 2026.
Open any card to get the full page for that route or ride. The details run down the left and the map fills the right, so you can read the numbers and watch the line at the same time.
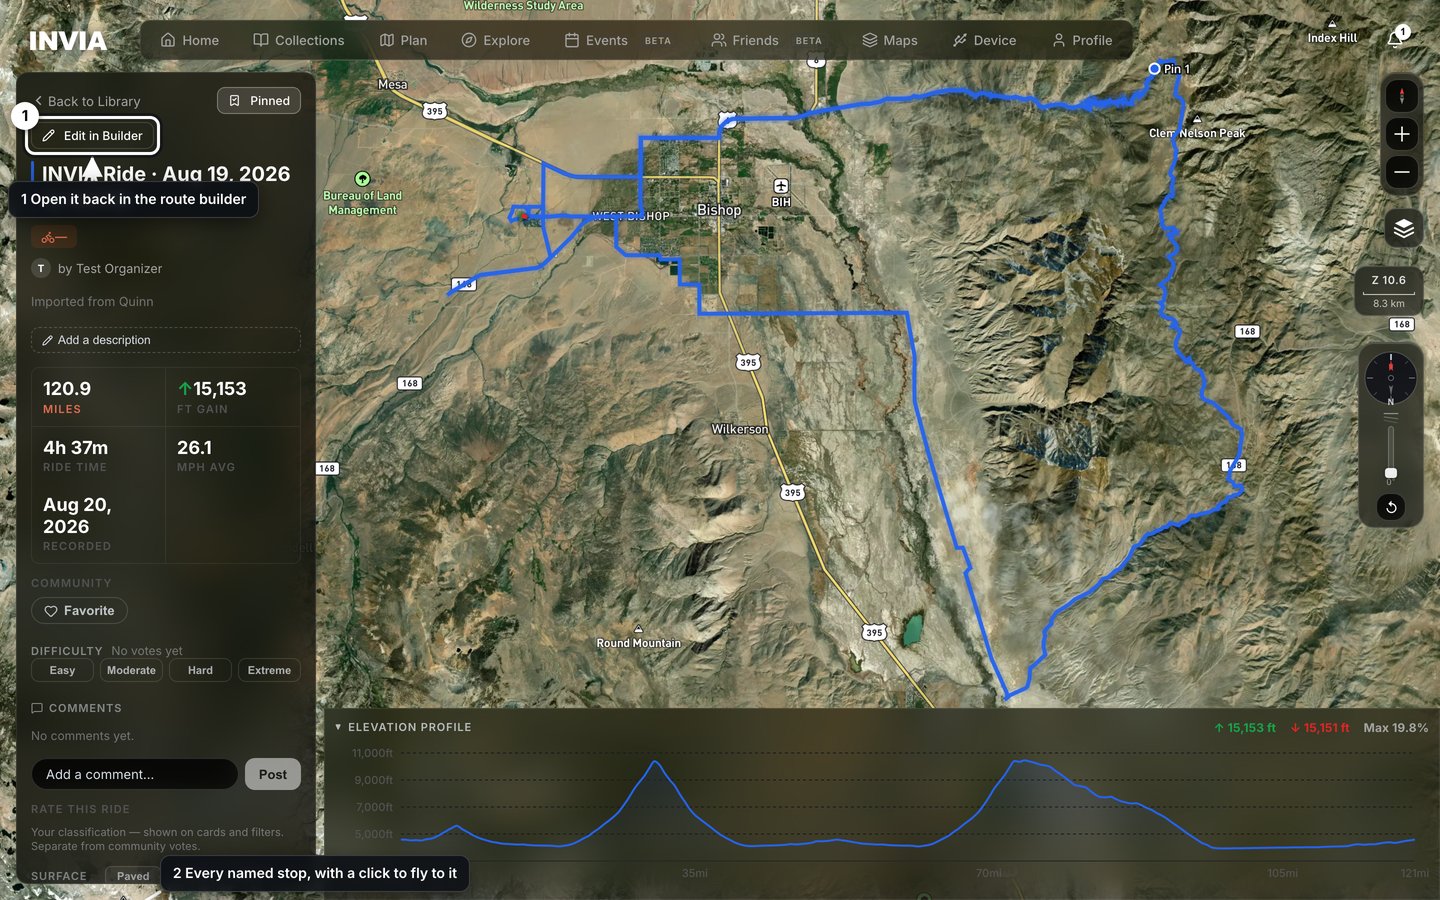
- Open it back in the route builder
- Every named stop, with a click to fly to it
Header row#
Three buttons sit across the top of the details column: the back button, the pin button, and one that changes with who owns the item.
The back button names the list you came from, so you always know where pressing it lands you.
| You came from | The button reads |
|---|---|
| Your library | Back to Library |
| The Collections page | Back to Collections |
| The Rides list | Back to Rides |
| The Routes list | Back to Routes |
| Explore | Back to Explore |
| A collection's map | Back to Collection |
| Another rider's profile | Back to Profile |
Press Pin to put this item on your profile, and the button then reads Pinned, which you press to take the item off your profile again.
Unpinning puts nothing in the item's place, because it drops out of the Pinned section on your profile and a short message confirms the pin was removed. If it was your only pin, that section disappears from the profile rather than leaving an empty box. Pins are private either way, so no rider other than you ever sees that section.
The last button depends on who owns the item, because you can edit your own work and only copy another rider's.
- Edit in Builder on your own item opens it in the route builder.
- Import to Library on another rider's item puts a copy in your library, and that copy is yours to edit.
Name row#
The name row runs top to bottom in this order.
- A color bar. On your own route, click the bar to pick a route color.
- The name, which you rename by clicking it. The tooltip reads Click to rename.
- The badges: the activity, then the difficulty you rated.
- The owner badge.
- Imported from {name}, when the item came from another rider.
- The description. Click your own description to edit it.
On your own item with no description yet, Add a description stands in its place, so there is always something to press.
A color you pick belongs to your copy of the route, so recoloring a route you saved from another rider never changes theirs. The choice redraws the route's picture, so the card in your library changes color too. The line is drawn in that color everywhere else the route appears, including a collection's map and the page a share link opens. The color travels with the file as well, so a GPX you export carries it for other mapping apps to read. A route sent to a Garmin carries the closest color that device can draw, which means the line shows in that color on the Garmin too.
Stats#
The stats sit under the name. A route reports what you planned and a ride reports what happened, which is why a ride carries more figures than a route.
| Item | Stats shown |
|---|---|
| Route | Distance, elevation gain, est. time, created. |
| Ride | Distance, gain, ride time or total time, moving time, mph max, overall avg or mph avg, moving avg, recorded. |
Distances are in miles, and they switch to kilometers when your units are set to metric.
A ride that includes a stop of more than 30 seconds shows total time and moving time together, so you can tell riding from waiting. A shorter ride shows ride time on its own. A ride with no recorded duration shows est. time instead.
A ride shows overall avg and moving avg together when the two differ by 0.5 mph or more, because that gap tells you how much of the ride was spent stopped. Otherwise one figure covers it and the ride shows mph avg on its own.
Community and rating#
The community panel holds favourites, difficulty votes and comments, and anyone signed in can vote and comment, so a route builds a reputation beyond the rider who made it.
Below the panel, on your own item, is Rate this route or Rate this ride. Your rating stays separate from the community votes, and it is the one that shows on cards and in filters.
| Row | Choices | Shown on |
|---|---|---|
| Surface | Paved, Mixed, Dirt | Routes and rides |
| Difficulty | Easy, Moderate, Hard | Routes and rides |
| Discipline | The seven activity types | Your own routes |
| Color | The route color swatches | Your own routes |
Press a pill to set it, and press the same pill again to clear it. The surface word then shows below the rating rows, in its own Surface section.
Clearing a rating takes it off everything that showed it, and nothing is guessed in its place. The Surface section disappears from this page instead of reading unrated, and the difficulty badge in the name row goes with it. The chip on the card goes too, and a card with neither a surface nor a difficulty rating carries no chip at all rather than a placeholder. The item also stops appearing under that Surface or Difficulty filter in Smart Files. Tags and Smart Files.
Waypoints#
Waypoints (N) lists Start, Finish and every named stop, and clicking a row flies the map to that point so you can see where it sits. Kinds and storage.
On your own item you also get + Add, a pencil and a trash control, because these are the waypoints you are free to change.
- Press + Add.
- Choose Drop on map or Add from nearby.
- For Drop on map, click the map where the waypoint goes, then name it.
- For Add from nearby, tick the saved waypoints you want, then press Add.
The pencil renames a waypoint on this route only, so the same waypoint keeps its old name in every other route and collection that holds it. Start and Finish have no trash control, because they hold the route's two ends.
Removing a waypoint#
Press the trash control and INVIA asks before it changes anything. The confirmation reads Remove this waypoint? and says the waypoint comes off this route only.
For a waypoint that came from your waypoint library, the confirmation adds one more line. Copies in your collections and other routes are untouched.
What you see after you confirm:
- The waypoint is off the Waypoints (N) list.
- The count in the heading drops by one.
- A toast confirms the waypoint was removed from this route.
- Start and Finish are still listed.
Tags and collections#
Each tag carries an X, and pressing the X takes that tag off this item. The tag itself survives, because the X only unhooks it from this one item. It stays in your sidebar tag list and on every other ride and route that carries it, so you can put it straight back on whenever you want. Press Add tag, type a name, then press Enter to put a new one on.
Below the tags is every collection this item belongs to, and clicking a row opens that collection. Press Add to collection… to file the item in one, or Add to another collection… when it already sits in one.
Actions#
Share#
Share opens the share sheet with a link to this item.
A share link only resolves on a public item, so INVIA makes the route public first, then opens the share sheet. A toast confirms the route is now public.
Make Public and Make Private#
Make Public puts the item on Explore, where any rider can find it. Make Private takes it back off Explore, so only you can see it. The button always names the state you are switching to, which means the word on the button is what you get and not what you have.
A share link you handed out stops opening once the item is private. Whoever you sent it to lands on a page saying the route was not found or is private, and a shared ride shows that same page. The link is only the item's address, so it is not revoked, and pressing Make Public again makes that same link work.
Export GPX#
Export GPX downloads this item as a GPX file, and the named waypoints travel in the file so your stops arrive with the route.
Export GPX is hidden on an item you saved from another rider.
What still works on an item with no Export GPX button:
- The device button still sends the item to a connected Garmin.
- Share still works.
- The map, the stats and the waypoint list all still show.
Directional arrows#
Press Directional arrows to turn the arrows on, then choose Forward or Reverse to set which way they point.
- Forward uses the stored direction.
- Reverse flips the direction.
The map previews the arrows straight away, and the copy the device button sends carries the direction you chose. The saved route is unchanged, so you can switch between Forward and Reverse as often as you like.
The device button#
The device button reports the state of the connection and of the send, so read the label before you press it.
| The button reads | What it means |
|---|---|
| Device | No Garmin is connected. |
| → Device | A Garmin is connected. |
| Sending… | INVIA is writing the file. |
| ✓ Sent | The file reached the Garmin. |
Device means no Garmin is connected. Pressing it queues the item and points you at the Device page to connect, so the item is waiting when you plug the Garmin in. A queued item is held rather than dropped, which is why the message tells you the item is queued rather than reporting an error. INVIA then asks you once whether to send it when the Garmin connects.
After a send, a toast confirms the item reached the device. The button reads ✓ Sent for 3 seconds, then goes back to → Device so it is ready for the next item. If the send fails, a toast names the device error and the button goes back to → Device, ready for another attempt.
A failed send leaves the item where it was, because nothing was written to the device and nothing about the item changed. It sits in your library exactly as before, so you can press the button and try the send again.
Delete#
Delete appears on your own item only, because you cannot delete another rider's work. The confirmation reads Delete this route? on a route, or Delete this ride? on a ride, and the body reads This can't be undone.
What you see after you confirm:
- The item page closes.
- INVIA returns you to the list you came from.
- The item is not in that list.
There is no undo, so press Export GPX first, or send the item to your Garmin, if you want to keep a copy.
The map#
The map draws the line for this item, with four controls sitting on top of it.
- The controls stack: a compass button that resets north, a zoom in button and a zoom out button.
- The layer switcher: Hybrid, Streets, Satellite, Outdoors, Nav Night and USGS Topo. The toggle reads the current layer name, or Layers.
- The scale bar.
- The compass, which shows the map bearing and pitch.
The elevation profile sits below the map, and moving the cursor along it marks the matching point on the line, so a climb on the profile becomes a place on the map. Named waypoints show on the profile too.